Cool Easy Skulls to Draw
How to draw a torso
Learning how to draw a torso will underpin much of your life drawing. The torso is the core of the body, and will display a lot of the gestural ideas in a pose if drawn fluently. The torso is probably going to be one of your first stops as you work through the figure, because it is so integral to the pose, due to its large size, and role in understanding the proportions of the body.
This guide takes you through everything you need to know about how to draw a torso. We'll take you, step-by-step, through the different parts of the torso and offer tips on how to approach drawing them in an accurate way. Want more tips? Try our how to draw tutorial roundup, and make sure you've got the best pencils, too.
How to draw a torso: Common issues to watch out for
One common issue with this area of the body is flattening everything out – as if the figure were a gingerbread man! This is mostly an observational issue, as the brain wants to think of the body as a flat schematic, rather than as three-dimensional shapes in space, but one we can combat with knowledge of the major forms of the torso. Because the torso can flex and bend, we encounter foreshortening far more than we realise, and will neglect to describe it if we don't account for how forms overlap and fit together, something anatomy will help us out with. As we build up anatomy, take care to only render what you can see of the behaviour of the muscles. It is all too easy to have too much of a good thing and get a bit heavy-handed!
Aside from flattening, another common stumbling point in drawing the torso is the habit of straightening things out. The torso can articulate by leaning forwards and backwards, as well as side-to-side, but as a general rule, try to avoid perfect vertical or horizontal lines. Even small tilts will look more natural and interesting.
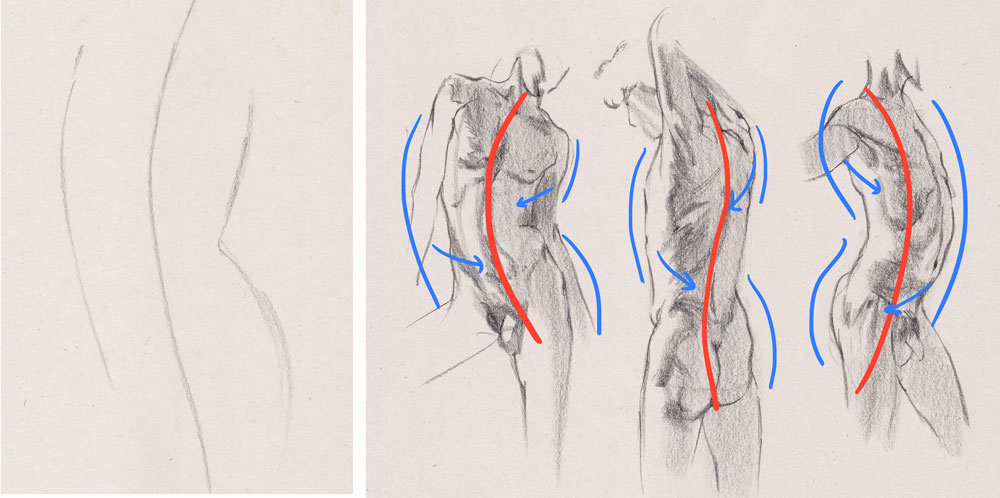
01. Study the action of the torso
(Image: © Lancelot Richardson)
The torso is the core of the gesture to the body, as it contains a large proportion of the mass of the figure, and has the interaction of the forms of the ribcage and the hips. There is a lot of movement in the torso; it can pinch to the left or right, but also bend forwards and backwards. Try to start with a line that describes this. As we place the outer bounds of the torso, try to travel from side-to-side, looking for a back and forth rhythm.
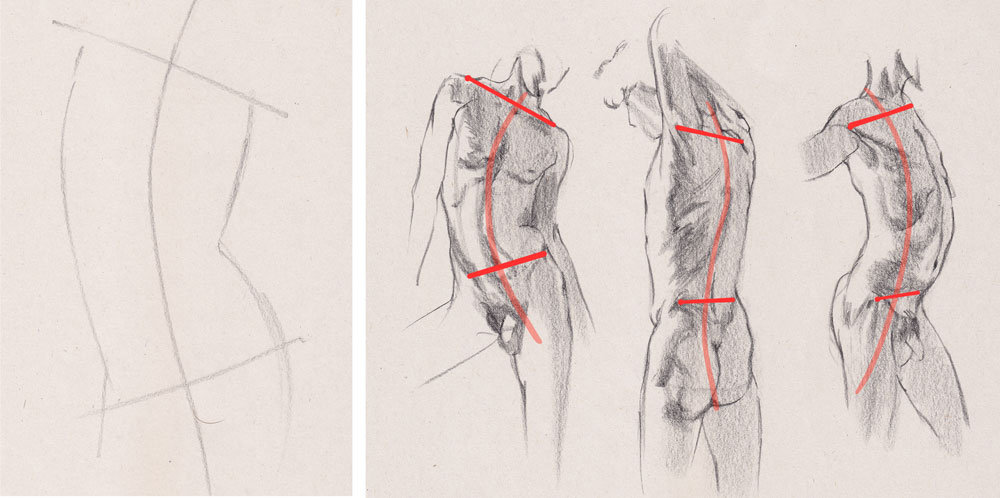
02. Notice how it tilts
(Image: © Lancelot Richardson)
The shoulders and the hips can move relative to each other, resulting in one side of the torso becoming compressed, whilst the other side stretches out. Try to look for the line of the shoulders or collarbones, and the line of the pelvis – these represent the tilting of the rigid forms of the ribcage and pelvis. Which side has them pulling together, and which side has them being stretched apart? Try holding your pencil up horizontally and comparing it to the angle of the shoulders and hips.
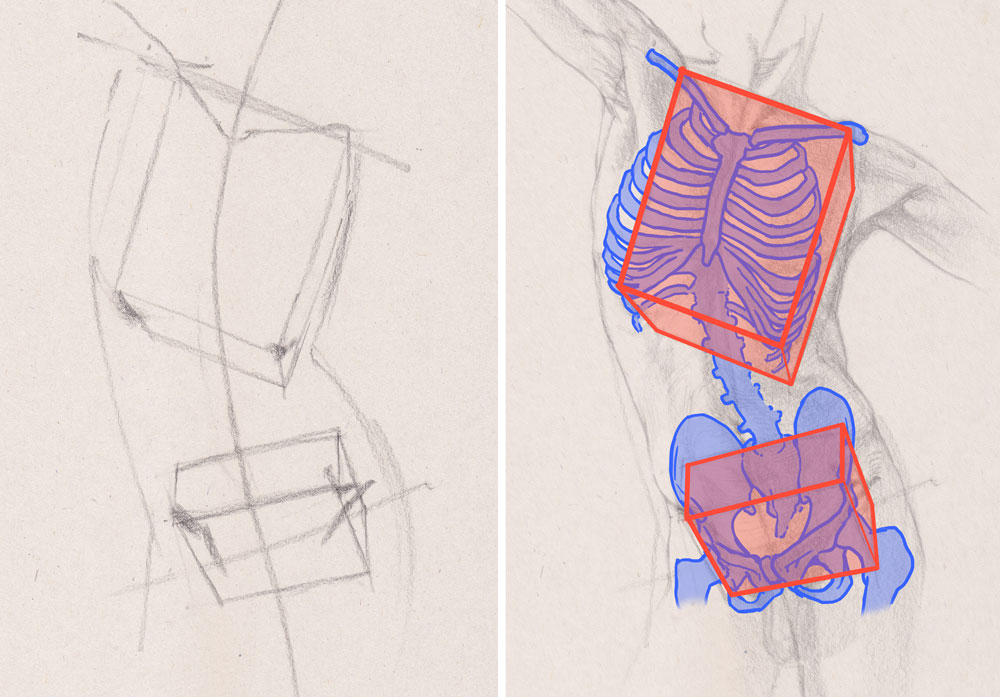
03. Use landmarks: Forms of the torso
(Image: © Lancelot Richardson)
Landmarks are places on the body where we can see little indications about what the anatomy is doing beneath the skin, particularly the skeleton, which is relatively unchanging. On the torso, we have landmarks created by the collarbones, ribcage – the 10th rib – and the iliac crest of the hips on the front. On the back we can see the scapula and the sacrum. The ribcage and the pelvis are large, rigid structures in the skeleton that the torso is built on. Use these landmarks to simplify them to block forms.
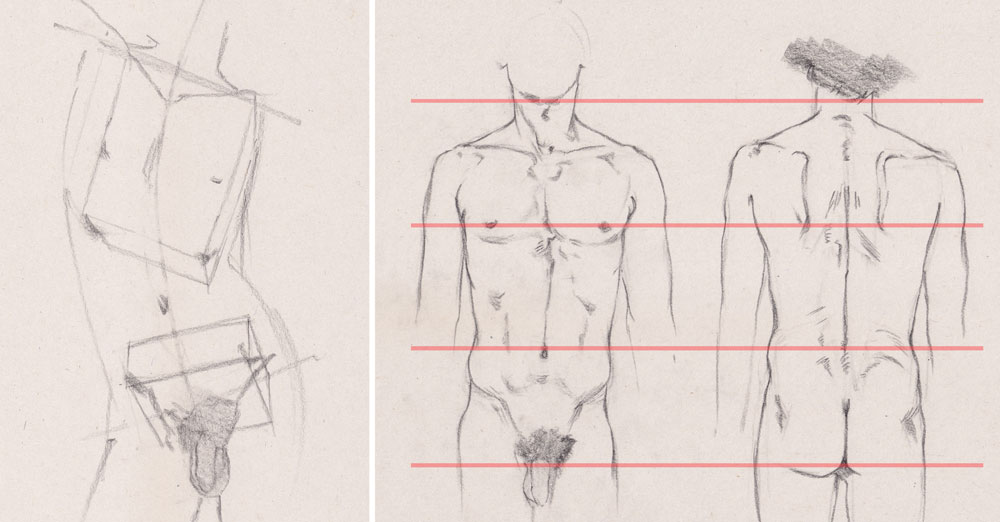
04. Use landmarks: Proportions of the torso
(Image: © Lancelot Richardson)
Aside from the bony landmarks, we also have surface features that help us navigate proportions. Typically, the nipples are about one head-length down from the base of the chin, with the navel being another head's length, and the genitalia being one more. This can vary a bit with individuals, especially heavier people, but is generally a useful way to check the proportions of the torso. Typically the torso ends just over halfway down the body, depending on how long an individual's legs are.
05. Notice the rhythms of the torso

(Image: © Lancelot Richardson)
The torso has a few useful rhythms – imaginary lines that help us describe the forms of the body, by flexing to fit muscles, and flesh, as the body moves. On the front, it helps to sketch a line that curves from each armpit across the chest, to describe the volume of the ribcage, a pair either side of the abdominals that intersects the tenth rib landmark, and a centreline. On the back, place another centreline – this time following the indent of the spine – and sketching a curve that runs under the shoulderblades.
06. Study the front muscles
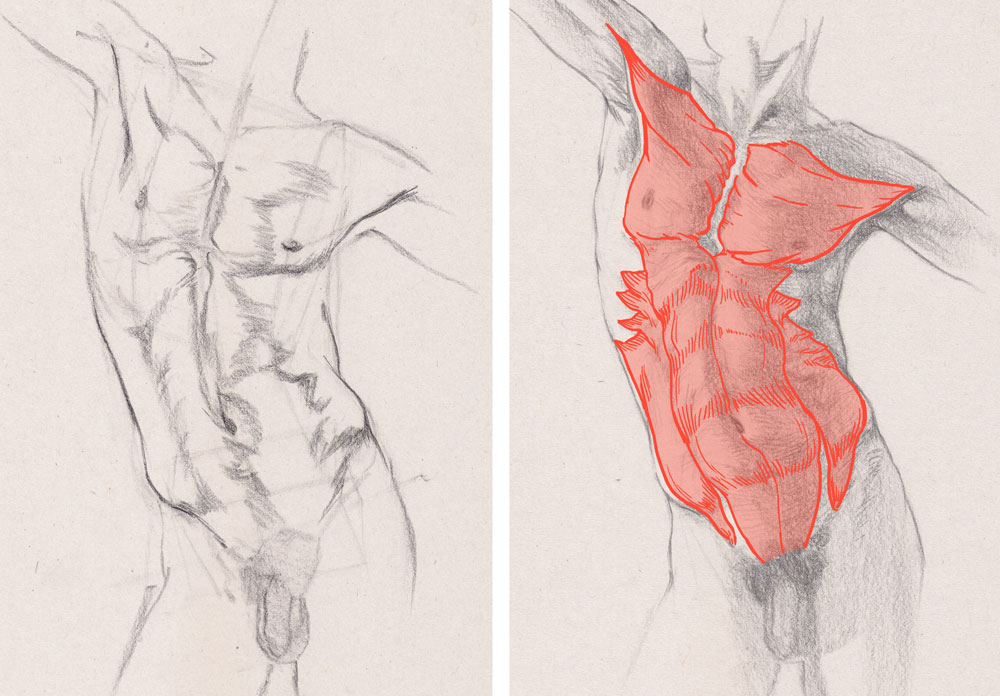
(Image: © Lancelot Richardson)
There are three large muscles that describe much of the torso: the pectoral, abdominal, and the oblique muscles. The pectoral muscle attaches between the arm and chest, and flattens as the arm lifts. The abdominals run between the ribcage and pelvis. As the body bends forwards and backwards, they stretch and compress. The obliques behave similarly to the abdominal muscles, but at the sides instead; they act when someone bends or twists sideways, creating a compression, whilst the opposite side stretches out.
07. Study the back muscles

(Image: © Lancelot Richardson)
The trapezius is a large muscle on the back that runs from the neck and shoulders, between the shoulderblades to the bottom of the ribcage. It influences surface forms a lot, especially around the shoulders. The latissimus is another important muscle in the back, attaching from the arms to the centre of the back and sacrum, covering a large area. It isn't always obvious as it is quite thin, but it is worth considering when you start to think of the directional lines you use to shade the back. These are the surface muscles; there is a lot more happening underneath these!
08. Get into the armpit

(Image: © Lancelot Richardson)
The armpit is underrated for its complexity, though this area is important in describing the volume of the torso. It is easy to make the mistake of drawing the arm as something that is flat and sprouting out of the side of the shoulder. However, there is a clear order of 'layers' of muscle and structure: the deltoid overlaps the pectoral, which overlaps the arm and creates a slight gap on the side of the torso. Then the latissimus sweeps up to the arm from the back, with a network of other muscles, to sandwich the torso.
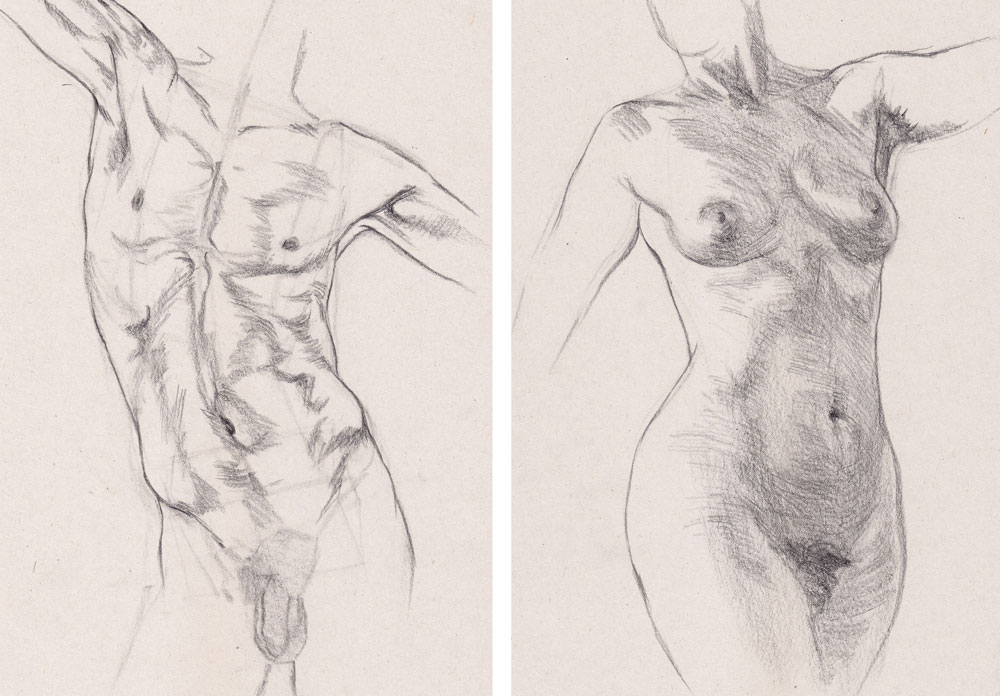
09. Understand the breasts
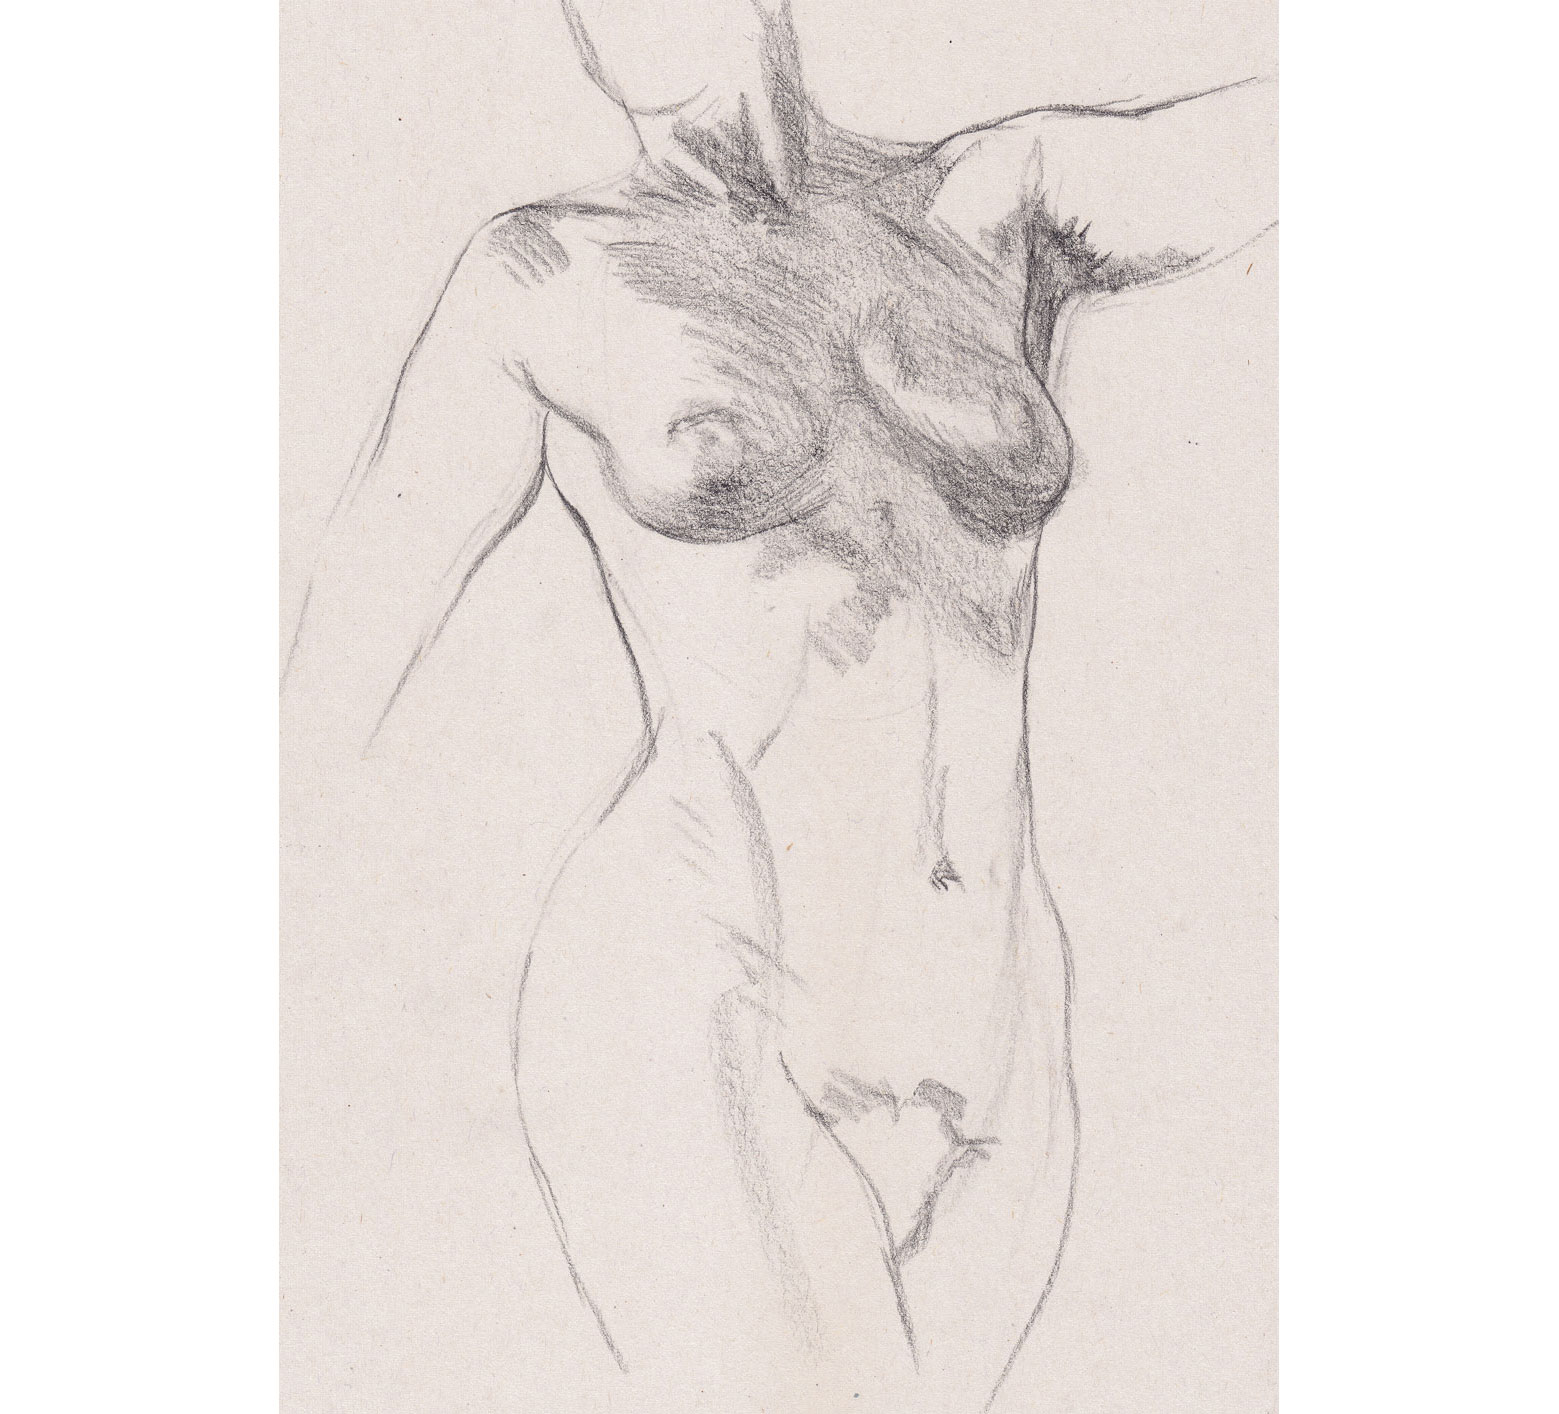
(Image: © Lancelot Richardson)
Breasts are an obvious difference between male and female models. Although breasts are a surface feature, they are still influenced by the position of the anatomy underneath, as well as the downward pull of gravity. One common issue is drawing breasts as if they were more rigid than they are. They are pulled down by gravity and tend to have a flatter profile near the top, whilst the lower part is more rounded. Note that the breasts fit on top of the rounded volume of the chest, and are separated by a small gap.
10. Pay attention to the waist
(Image: © Lancelot Richardson)
The waist is another area where there is generally a difference between the sexes, with males having more muscle and fat here, whilst females tend to have a narrower waist. When drawing the waist, pay attention to the placement of the navel relative to the top of the hip, as this will help with describing foreshortening. It is also worth remembering that the mass of the abdominals, and associated fat deposits, are crossing over this area to 'slot' into the top of the pelvis.
11. See the interlocking forms
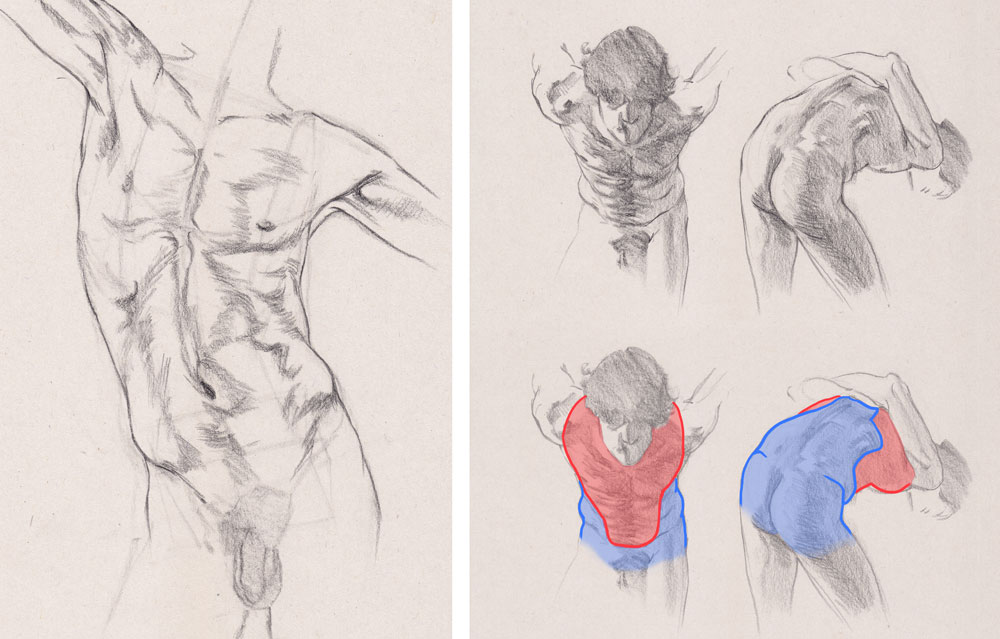
(Image: © Lancelot Richardson)
Interlock is very important for the forms of the torso. This is the idea that the three-dimensional forms of the ribcage and pelvis slot together by means of the attached muscle masses. Most of the muscles of the body are interconnected, but it is vital to remember that here – paying attention to places where muscles are passing in front of each other will aid you in deciding where lines should overlap. It's useful to ask yourself 'Which is closer?' if you're having trouble deciding where to place a line.
12. Add surface features
(Image: © Lancelot Richardson)
As mentioned before, the nipples and navel are useful for judging proportions. They are both surface features, variable from person to person, and are liable to get stretched in the direction of the muscle underneath, especially in leaner figures. The navel will often appear a bit deeper, and have a softer edge in anyone who isn't quite so lean. Nipples tend to be quite small on male figures, but vary a lot more in women. Try to avoid hard edges or lines around the areola, and use softer rendering to describe the change in skin tone.
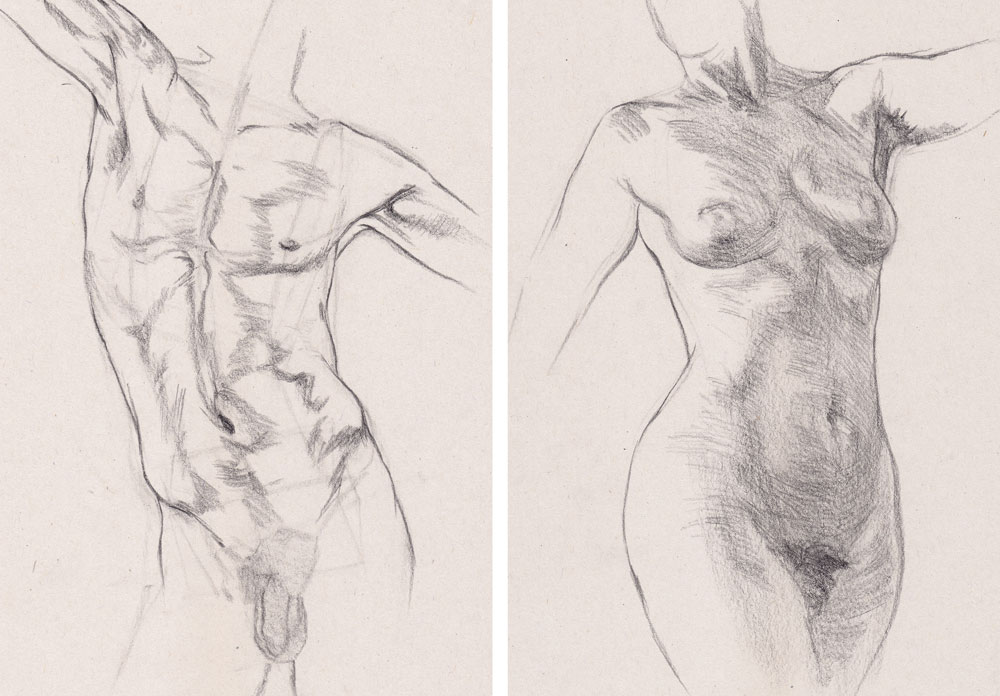
13. Shade the front form
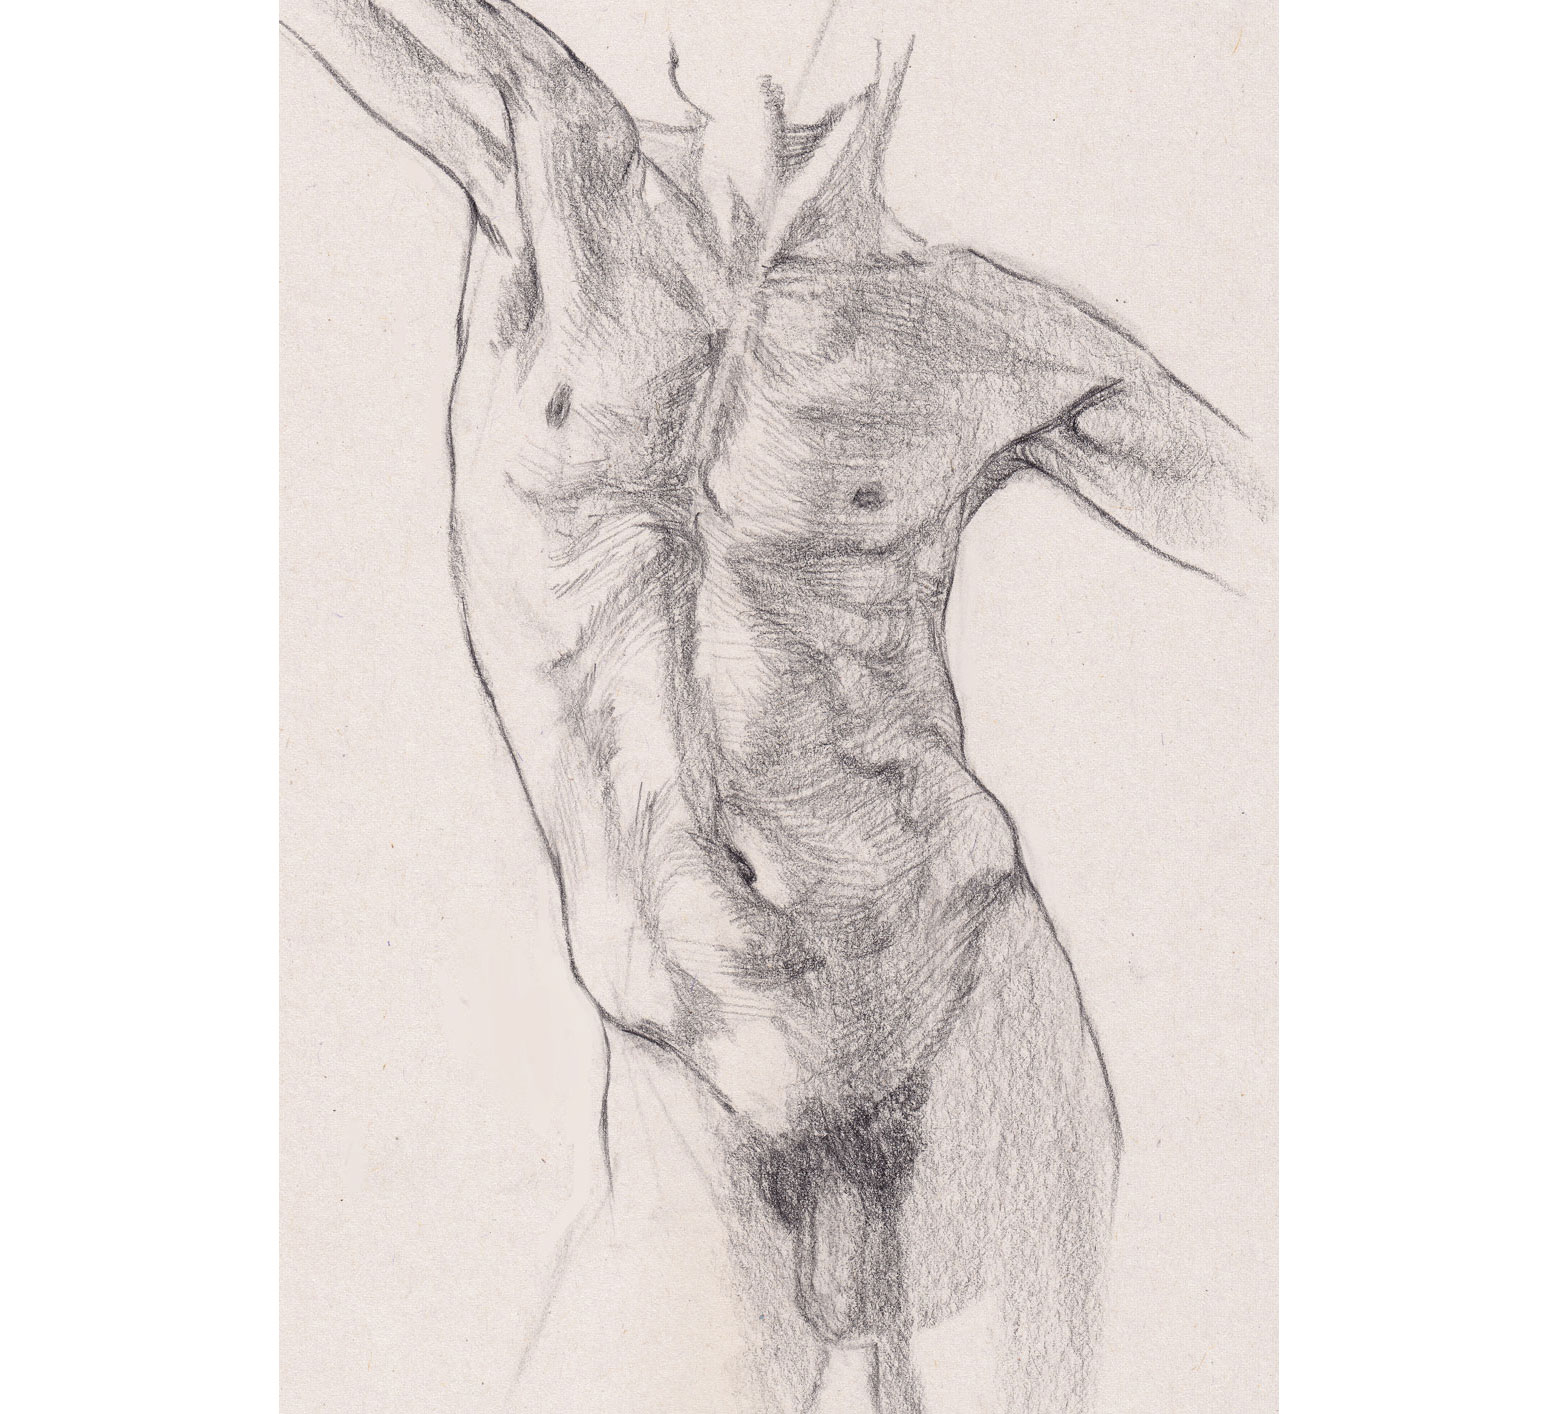
(Image: © Lancelot Richardson)
With most of the details and edges laid in, block in an even area of shadow. Here, we are describing the forms of the torso, paying particular attention to both the surface contours, and the directional flow of muscle. Active areas tend to have muscles becoming rounder as they 'bunch up', whilst inactive areas get stretched out – we can indicate this with rounder or straighter marks. Keep in mind the cross section of the torso as we get to the sides, and let your hatching lines wrap around the figure, rather than collide with the edge.
14. Shade the back forms
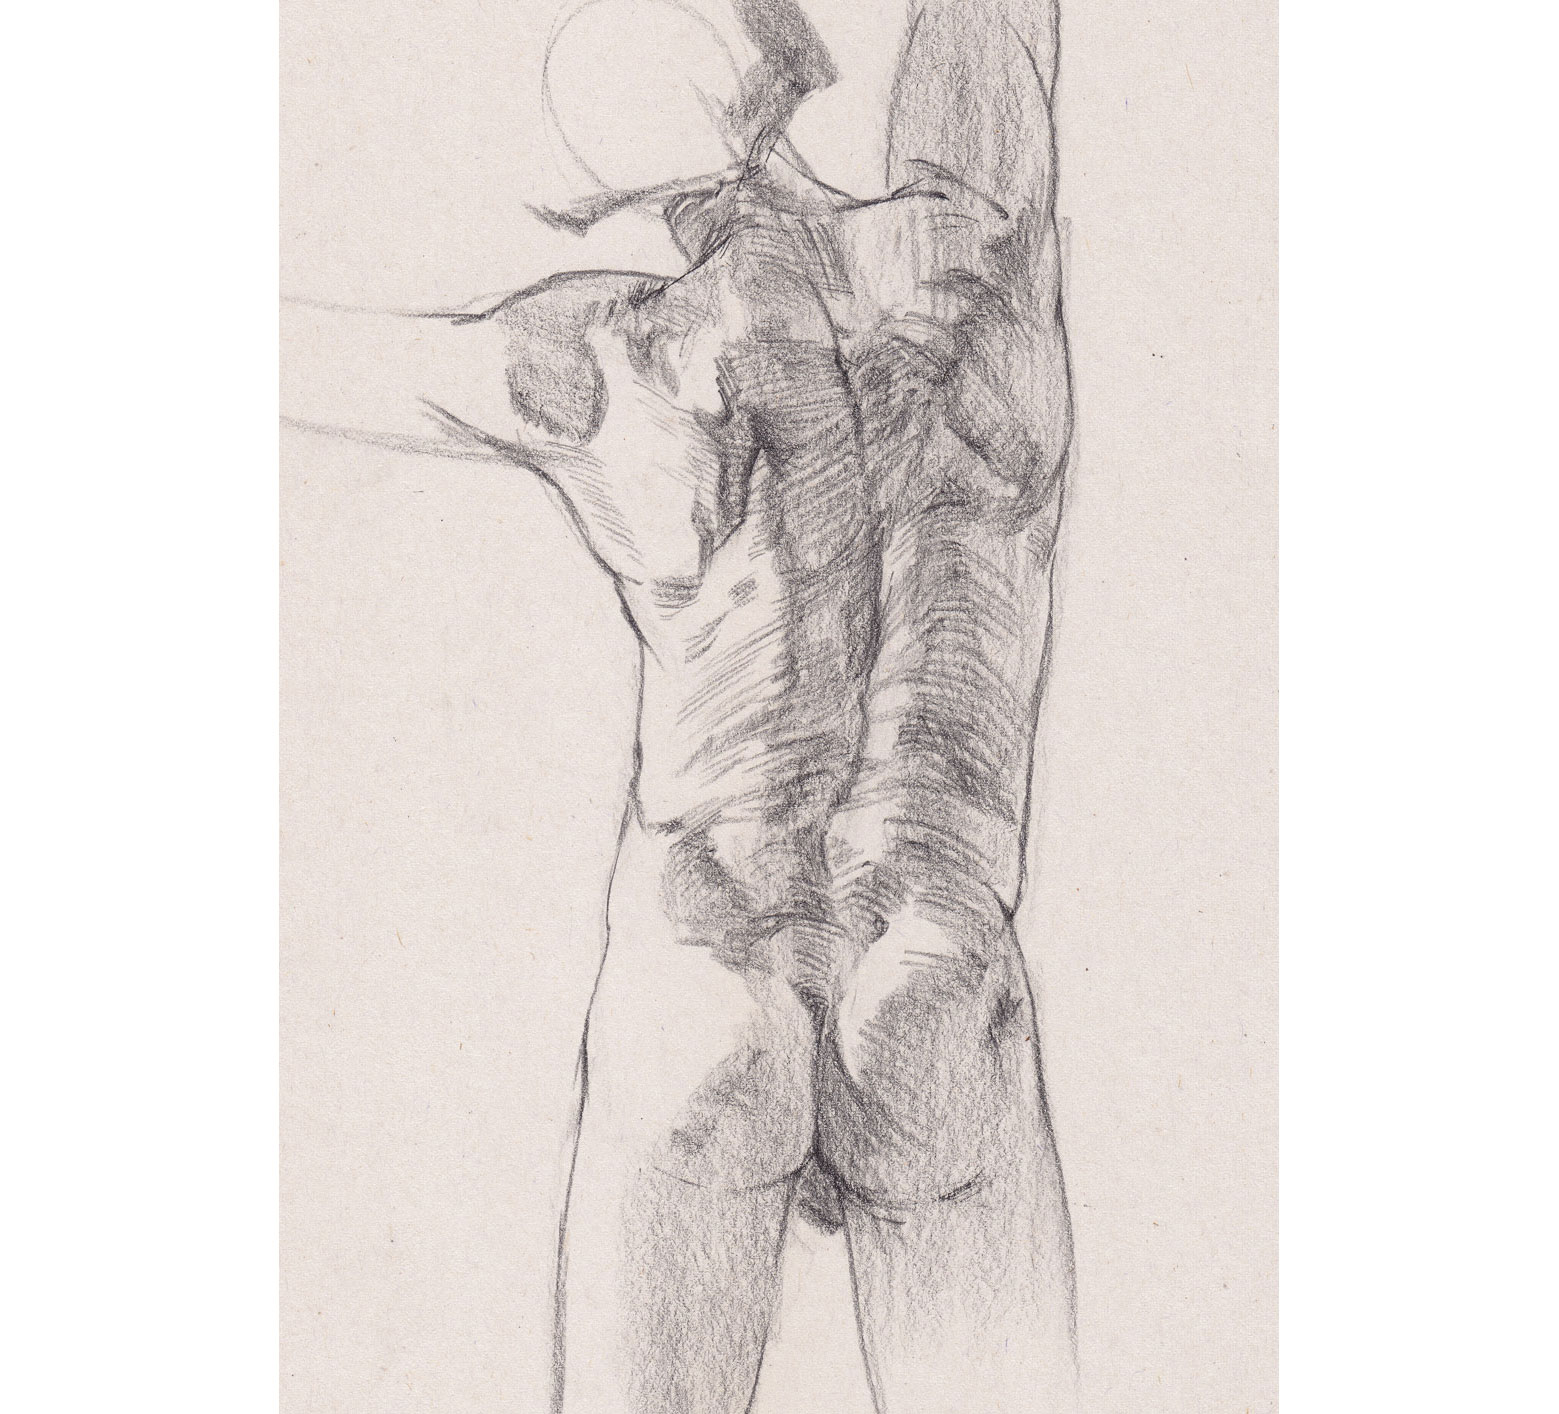
(Image: © Lancelot Richardson)
The back is flatter than the torso. Often it can be tricky to find evidence of anatomy, so try to look for the smallest hints – tiny shadows, or bumps, can help describe the tip of a shoulder blade, or where a muscle fits over another. The spine is a very reliable landmark, and often is a good place to start. If the body hunches forwards, the muscles of the back stretch, with the spine creating little bumps on the surface. If the body is erect, or leaning back, the spine will recess into the more active forms of the back muscles.
15. Add final stages
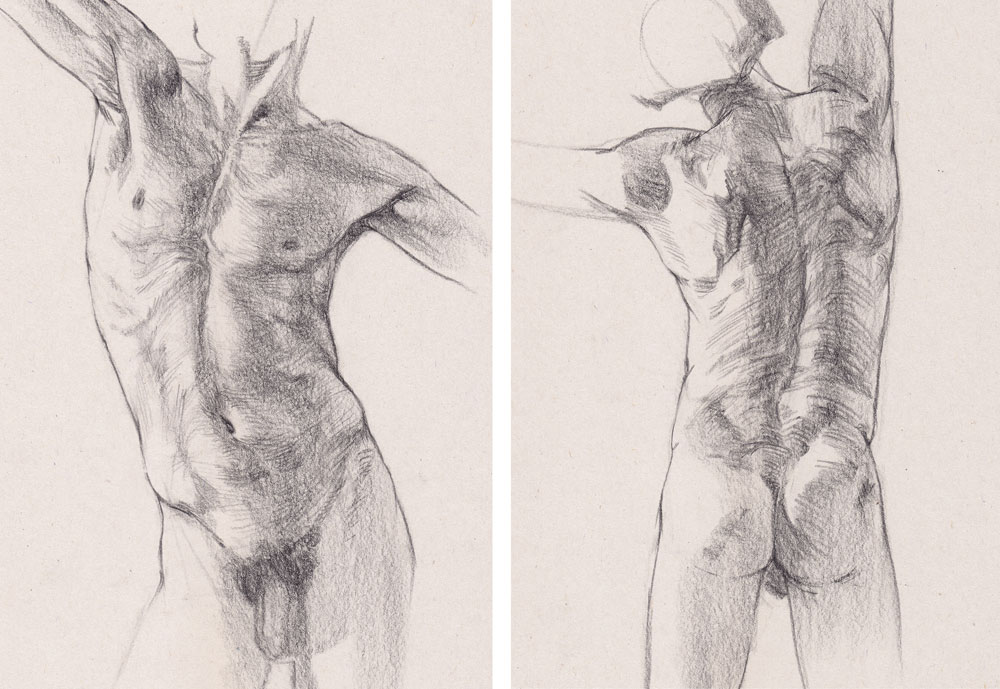
(Image: © Lancelot Richardson)
In this final stage, focus on tightening up the outlines, and deepening any shadows that have been missed. This is a good time to go in and add the last surface features, such as any body hair – though take care not to render it too heavily! Stick with a very light touch and small marks. Double check that the overlapping lines on your figure help describe it as well – contour lines that just go around the edge like a silhouette will flatten the figure, so look for places where forms cut in front of each other.
This content originally appeared in Paint & Draw: Anatomy. You can buy the Anatomy bookazine here . Or explore the rest of the Paint & Draw bookazines .
Read more:
- How to draw a neck and shoulders
- How to draw a character in pen and ink
- The best sketchbooks to make you a better artist
Lancelot Richardson is an artist, painter, and freelance illustrator based in Brighton, UK. He tutors life drawing at independent art school Draw Brighton, and teaches in their online Patreon courses. He is also a freelance writer, producing articles on art and drawing. He works in both traditional and digital mediums.
Related articles
Source: https://www.creativebloq.com/how-to/how-to-draw-a-torso
0 Response to "Cool Easy Skulls to Draw"
Post a Comment